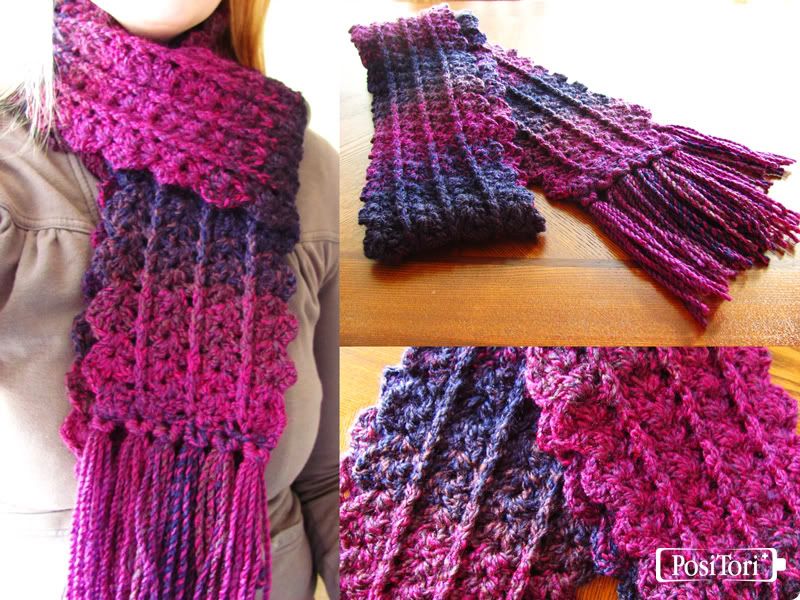
Free Crochet Pattern: Zip Line Scarf
Gauge: Not important. Judge by your yarn weight. I used an H for my medium worsted yarn. I recommend an I or J for chunky yarns.
**Remember The chunkier your yarn, the thicker and wider your scarf will be.
Stitches Used:
ch – Chain Stitch
dc – Double Crochet
slst – Slip Stitch
fpdc – Front Post Double Crochet
bpdc – Back Post Double Crochet
Shell - Shell Stitch (2 dc, 1 ch, 2 dc in same stitch)
If you are unsure how to make a fpdc or bpdc I recommend looking up the stitches on youtube.
*This scarf takes roughly 2 skeins of yarn. I use about 340 yards. *If you use specialty yarn that is less around 100 yards a skein, I recommend getting 4 skeins.
*Note. After finishing with your first skein of yarn, I recommend cutting your fringe. It will lay nicer if the yarn is cut from the top of the skein. Towards the end the yarn gets curly. I cut 4-5 strands for each set of fringe, depending on yarn weight. You will need 12 sets of fringe.
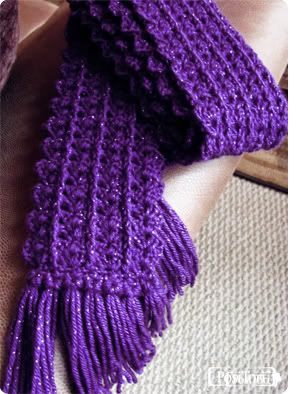
*We will first be creating loops. These are important because they are used to attach the fringe to the scarf. The double crochet is also important, it acts as a filler stitch so there will be no gaps.
Pattern:
1. Ch 19. (Leave a long tail, it will be tucked and blended into the fringe later)
2. Ch 3, dc in your original 19th stitch. (4th chain from hook) Skip 2 ch, slst in 3rd ch. *Ch 3, dc in same stitch, skip 2 ch, slst in 3rd ch. Continue from * to end. (you should have 6 loops total)
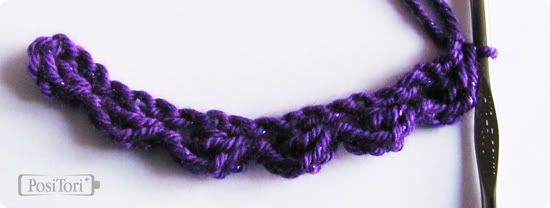
*Do not turn, instead continue on the top stitches of your original 19 chains.
3. Ch 3, Shell Stitch into first chain (ch will be connected to your slst knot), *skip 2 ch, dc, skip 2 ch, shell, Continue from *. (Last stitch should be a shell), Turn.
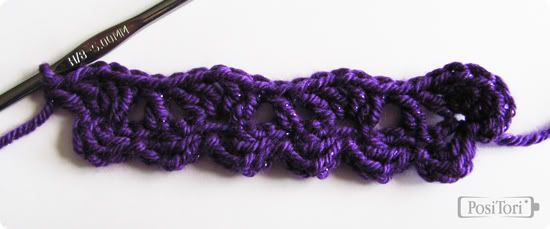
4. Ch 3, shell in first shell stitch gap. (the chain between your dcs), *bpdc around next dc, shell in next shell stitch gap. Repeat from *. Turn.
5. Ch 3, shell in first shell stitch gap, *fpdc around previous stitch's bpdc, shell in next shell stitch gap. Repeat from *. Turn.
6. Continue alternating bpdc and fpdc pattern until desired length.
F.O.
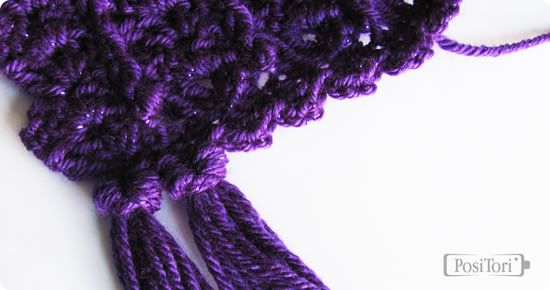
7. Ch 3, *dc in same stitch, skip 3 stitches. Slst in next stitch. Ch 3 repeat from * to end. (last stitch will fall on outside chain stitch)
8. Attach Fringe through the chain loops only, don't pull fringe through the dc's.
This scarf makes a great gift for family and friends! Or just make one for yourself! It's really easy and relaxing once you get the hang of it. I love this pattern and I hope you will too :) I also put this pattern up on Ravelry. If you make one I'd love to see it!
For Personal Use Only Please. :)

26 comments:
Beautiful! Thanks so much for sharing your pattern, I can't wait to make some of these for our impending winter :D
This is a beautiful scarf! I need a little more practice, but I'm pinning this for when I can do it.
Hello! I came across this pattern just love it! I am the editor of AllFreeCrochet.com and would love to feature your tutorial on my site with full credit to you. I know my readers would love it as well, and in return would generate some nice traffic to your site. If you agree and would like us to feature your project, our readers will simply click the link to your blog to get your full tutorial. It's really that simple. Please let me know if this would be ok. I look forward to hearing from you!
Jenny
jbenoit@primecp.com
HELP!!! lol I can't seem to find the individual chains after working row 1 to use for row 2. Am I missing something? I can see them in the picture but for some reason mine isn't turning out quite right. (Not very advanced with my crochet but trying to learn more)
Love this scarf!! Looking forward to making one but I was wondering exactly what the yarn was that you used in the intro photo. the pink and purple gradient? I LOVE IT!! Thanks for the great pattern.
~Lane
I loved this scarf pattern.I have just finished this.Thank you so much for sharing :)
I just started this pattern and really like it. It works up very easily. I like the effect used for the side edging.
An additional note for those interested, the pattern is done in multiples of 6 stitches. I wanted my scarf a little wider so I added 6 chains to the beginning count. Depending on the yarn used and the look desired you can add or subtract multiples of 6 chains to the beginning count.
Thanks so much for sharing this pattern!
I started this scarf around 7:30 am this morning. It is now 8:40am.and am about 3/4 of the way through. So simple, interesting and relaxing! Not to mention so pretty! I am going to rip an afgan I have been bored with and make a scarf for everyone! Thanks for this pattern, it will be one of my favorites!
Hi, I love this scarf pattern and really like the multi color scarf picture. What brand and type of yarn did you use for that? Thanks so much,
Hi there, I fell in love with your scarf, I post crochet patterns from other blogs. I would love to post this one too. I will give you all the credit, I put in your and people then just need to click on the link. Would that be fine with you. Please let me know asap.
If you would like to see an example of how my page looks and how I do the links here is a link
http://livinggood-entrepeneural.blogspot.com/2014/09/easy-step-by-step-knee-high-boot-socks_4.html
Thank you
Margaret
Hi can you make a tutorial video on how to make this scarf? Thank you
Have been looking for something with a little texture and a little different to give me a break from a graphghan. This is exactly what I was looking for!! Thanks for the pattern!
Hello and thank you for this beautiful but easy pattern. This was my second project and first time to read and follow a pattern. I used a chunky yarn and it's over 5"3 long so it reminds me of a blanket...which is what's next on the agenda. Thanks again!
Has anyone figured out what is that beautiful yarn she used is?
What am I doing wrong?? One side keeps increasing and the other looks right??? I can't add a photo to show
Working on this one now. Love the pattern it's so pretty and simple. I was having issues with it curling up as the FPDC and BPDC were pulling the side up. I fixed mine by turning them into FPTC and BPTC. If anyone else does tight stitches, this change may help you!
Pretty cool post. It’s really very nice and useful post.Thanks for sharing this with us!it’s my first visit.
nose fillers
bellafill vs voluma
derma fillers
silicone filler
fillers for wrinkles
smile line fillers
wrinkle filler injections
fillers for nose
cosmetic fillers
fillers for smile lines
permanent dermal fillers
smile lines treatment
permanent facial fillers
artefill filler
artefill for lips
injectable wrinkle fillers
This website is really a stroll-by way of for the entire info you needed about this and didn’t know who to ask. Glimpse here, and you’ll definitely uncover it. online casino real money
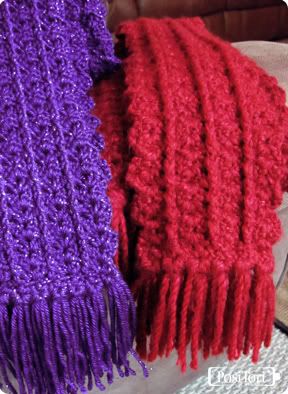
I appreciate the pictures since you didn't explain what you meant by "shell". Every pattern uses that word to mean something different so without your lovely pictures I wouldn't be sitting here making this lovely scarf.
I loved making this scarf, but I was wondering how long you cut your fringe? Thank you.
Darlene Manes
I would like to know if there is a video of this. I did the first row and I know it says do not turn and chain 3 and then I get toally lost, this is why I was hoping there was a video for that part. the scarf is beautiful and I would really love to crochet it. Thank you
I would like to know if there is a video of this. I did the first row and I know it says do not turn and chain 3 and then I get toally lost, this is why I was hoping there was a video for that part. the scarf is beautiful and I would really love to crochet it. Thank you, Darlene Manes
Whats up! I just wish to give an enormous thumbs up for the great data you will have right here on this post. I will probably be coming again to your blog for more soon. real money casino
Post a Comment